The goalkeeper is perhaps the most important and special player of a floorball team. Without him or her, you can’t even start the game. It’s their job to keep your goal empty and their incredible saves are what prevents your opponents from running you over.
In this article I am going to talk about Goalkeeping 101: the basics of goalkeeping.
As a field player you may think that this article isn’t written for you. Wrong!
Why every floorball player should at least be a goalkeeper once…
I think every fielder should have thrown at least once, even if it’s only during practice. I’ll explain why later in the article.
This article is useful for every floorball player: novice goalkeepers, experienced forwards, and everyone in between. For goalkeepers, I’ve got tips to improve your game, for field players these are tips to make it easier to score. In follow-up articles on goalkeeping, the emphasis will be on goalkeepers themselves, but those articles will also be relevant for field players.
In this article I cover the following points:
- Why everyone should have been goalkeeper at least once
- Goalkeeper position in the goal
- Goalkeeper position in the field
- How to practice (at home)
- What to expect in our follow-up
Let’s get started!
Why everyone must have been goalkeeper at least once
The short answer to this question consists of two parts:
- You get to know the weaknesses of the goalkeeper better;
- You learn to understand the goalkeeper better.
The long answer to this question can be found below:
Getting to know the weaknesses of the goalkeeper (of your opponent) better
If you want to win a game, you have to score. To score, you have to shoot at goal, but of course, the opponent’s goalkeeper is there to stop you.
Suppose you run towards goal during a counter – it’s just you vs. the goalie – what will your plan be? Are you going for a shot, are you trying to play the goalkeeper out with a feint or are you trying to play the ball past him?
Before you answer this question, a general notice: we asked the very same question (and many more) to Finnish national team player Joonas Pylsy who we asked for tips to beat a goalkeeper, together with Johan Rehn and Tiltu Siltanen, two of world’s best goalkeepers who we asked about world-class goalkeeping advice. In the next months, we will publish more articles both about goalkeeping itself (for goalies) as well as about beating a goalkeeper (for field players). You can read all the articles as a patron of our FloorballToday community on Patreon for just a small monthly donation to keep us going.
The choice you make probably depends to a large extent on your own technique and skills. However, it should also depend on the goalkeeper.
In a counter, for example, it is easier for a goalkeeper to stop a direct shot than an action in which you cross the axis of the pitch.
Recommended: read back the article about the Royal Road if you don’t understand why it’s so important for players to cross the axis of the pitch – the Royal Road – if they want to score.
How do you get to know the weaknesses of goalkeepers? By putting on that suit yourself! Goaltending is so different from playing as a field player that you can’t get to know it until you try it yourself.
How about the following example: Maybe you have agreed within your team that someone should always stand in front of the goalie at free balls, for ‘screening’ (i.e. making sure the goalkeeper has no view of the ball). Only when you experience this as a goalkeeper will you understand how much screening affects your performance (disclaimer: a lot!).
For example, there are many things that you will only really understand when you experience them yourself: that someone has to go deep as soon as you have picked up the ball so that you can start a counter if necessary; that a Royal Road pass, followed by a direct shot at goal, is extremely difficult to stop; or that a shot towards the cross is perhaps easier to catch than a low shot.
So in order to score more, you need to understand which shots and actions goalkeepers have the most difficulty with.
Understand your own goalkeeper better
Part two of the answer to the question of why everyone should goal at least once: you’ll learn to understand your own goalkeeper better.
As mentioned, you have to score if you want to win a game. In order to achieve this goal more easily, you agree on a tactic.
You discuss your offensive system – e.g. the 2-1-2 system – and even tactics in power play and box play are discussed. This way, as a team and a line, you ensure that the five field players understand each other better and better in the field.
But… you’re not five, you’re six!
The goalkeeper contributes fundamentally to the field play. In defense he can steer, in ball possession of the ball he can speed up the pace with a fast throwout. Conversely, he can slow down the game by holding the ball a bit longer. He can support tactically by providing coaching because he has an overview of the whole field.
In short, the goalkeeper is an important player who is too often not yet optimally used.
In order to better understand your goalkeeper, it is a great help if you can also look at the game from his point of view.
How does a game or training exercise take place from the goalie’s point of view?
Suddenly you better understand how you can position and/or behave as a defender in relation to your goalkeeper, when you have to offer to receive the ball, why you are trying to prevent the opponent from shooting, all sorts of things like this
“Okay, okay, we get it. Everybody should play goalie sometime. But how do you start?”
In the following chapters I’ll explain the basics of goalkeeping to you.
Goalkeeper position in the goal
Time to put on your goalie suit! Outerwear: protective gear, elbow protector, overshirt. Underwear: toque (optional), knee protectors, goalie pants. Furthermore: shoes, gloves, helmet – and you’re good to go!
What’s next? We start with your posture in the goalie.
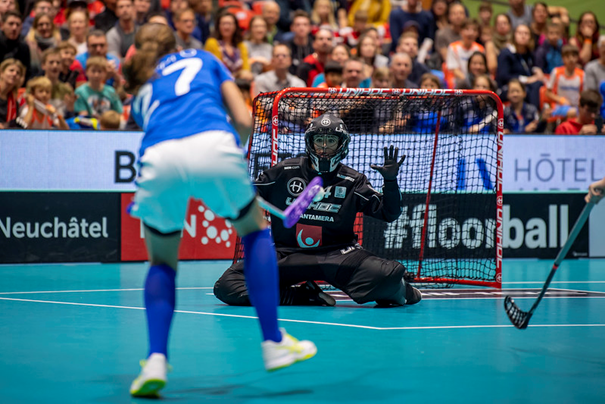
This picture was taken during the World Cup 2019. Amanda Hill (Sweden) tries to stop a shot from Oona Kauppi (Finland). Hill’s posture is the basic posture for goalkeepers. From top to bottom the following things stand out:
Head up: Hill sits upright, so her head almost reaches the height of the goal. In this way she increases her reach and reduces the chance of scoring;
Hands at head height: Hill’s hands (her left hand at least) are raised. As a goalkeeper, try to have your hands at about head height with every shot, but not next to your head. To make it very schematic, I’ve made the picture below, where we see the goalkeeper from above. The two rounds are where the left and right hands are, a bit in front of the head.
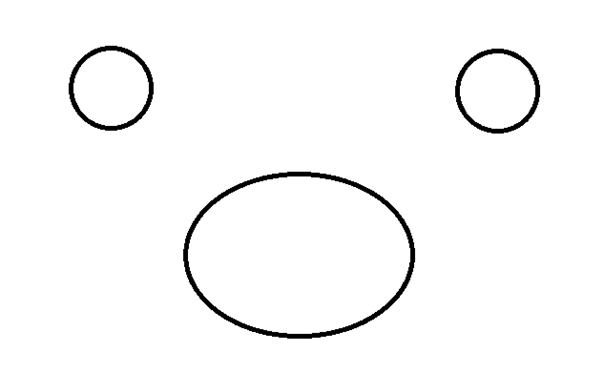
Why is this? This way you can always see your hands, which benefits your savings percentage. Your hand-eye coordination plays an important role in this, so make sure you can always see your hands at the edge of your field of vision.
Upper body raised: This is related to the raised head of Hill. She ensures that she has an active posture, with her head up, her shoulders back and her torso raised. When practicing this you will notice a tendency to ‘collapse’, but still try to tighten your core and sit upright again and again.
Legs facing sideways: this part is perhaps the hardest point for novice goalkeepers. Your natural posture, when you are on your knees, is that your feet are sticking out backward. In floorball, this runs the risk of the ball going between your legs. This is why goalkeepers often have their legs pointing sideways.
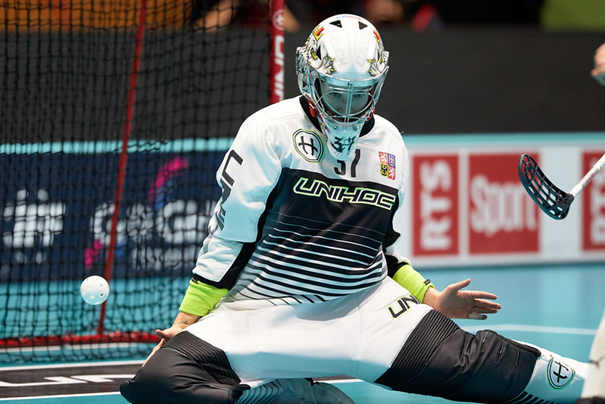
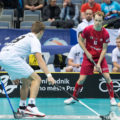
In the picture above you see Jana Christianova, the Czech goalkeeper during the World Cup 2019. She has positioned her right foot underneath her to prevent the ball from going between her legs. She has stretched her left leg out to the side, in order to increase her surface area even more. This way she makes it more difficult for the opponent to score.
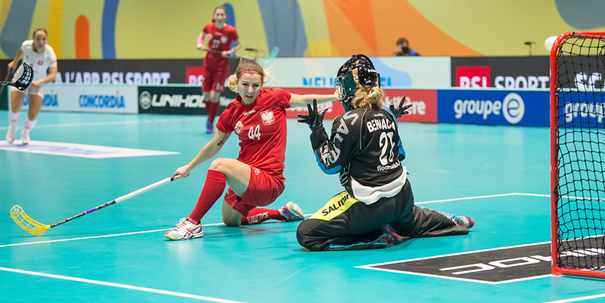
It varies from moment to moment which foot you keep under your body and which one sticks out to the side. In the picture below we see the Polish goalkeeper Patrycja Bernacka – twice! (full picture will follow later on in this article):
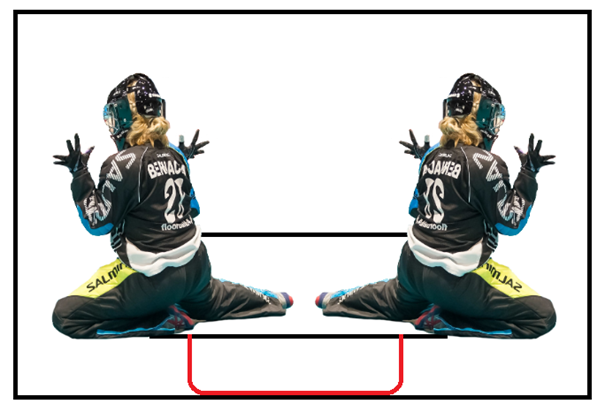
Around Bernacka the goal crease (big square) and goalkeeper area (small square) are drawn, and in red also the goal. As a guideline for goalkeeping, you can use the following:
Ball in the left side of the pitch? Your left foot covers the space between your legs, your right leg extends to the right. So both feet point to the right.
Ball on the right side of the field? You guessed it: everything is mirrored. Now your right foot is protecting balls between your legs. Your left leg sticks out to the left.
Ball right in front of you? You can use both options in this case. It is important that you actually choose one of these two options and don’t stick your feet backward (because, as a reminder, there will be space between your legs and the chance of the ball rolling right past you into the goal is also bigger).
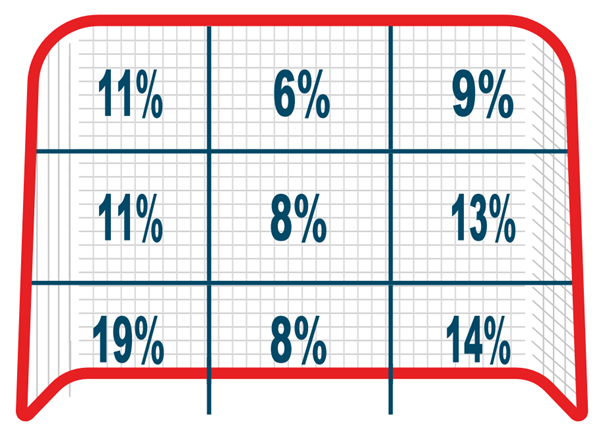
The above statistics come from a study commissioned by the IFF after WFC 2016. You can see the percentage of goals scored in each zone of the goal. You can also see the high percentages in both corners at the bottom: an extra reason to stretch your ‘outer’ leg sideways!
Unfortunately, during a game, you are often forced to change places, from left, to right, forward and back. Now that we know the basic position of the goalie in the goal, we have to move on to the next part: your position in the field.
[ppp_non_patron_only]As much as we love floorball, we dedicate a lot of time and money to the FloorballToday project (more info here). That's why we ask you for a small monthly donation. By clicking the button below you can become one of our supporters and read the rest of the article. Thanks a lot! Already a patron? Then here is where you can login. [/ppp_non_patron_only][ppp_patron_only level="6" silent="no"][ppp_patron_only level=”6″ silent=”no”]
Goalie position in the field
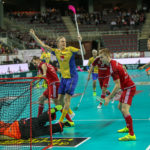
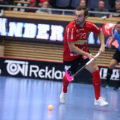
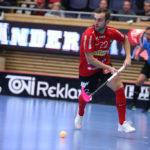
We start with a real-life example: the match between Switzerland and Norway of the WFC 2018. In the picture below you see Markus Jelsnes (Norway) sitting in the goalkeeper area (the black area). Only the goalkeeper is allowed in this area. In the larger area – the crease – both fielders and goalkeepers are allowed. In addition, the goalkeeper is allowed to take the ball into his hands within this area (even outside the box, as long as he keeps in contact with the crease).

On the photo it is clear that Jelsnes is in trouble, as Dan Hartmann (Switzerland) is ready to shoot the ball into the goal. So now we come to the next point that is important for goalkeeping: positioning in the field.
(By the way, Hartmann didn’t score in the above situation. Switzerland only won the quarterfinals in overtime, when Tim Braillaird scored 3-2)
The image shows that it is not easy to choose position in the field. The crease is 4x5m, so there are a lot of places where you can sit as a goalkeeper.
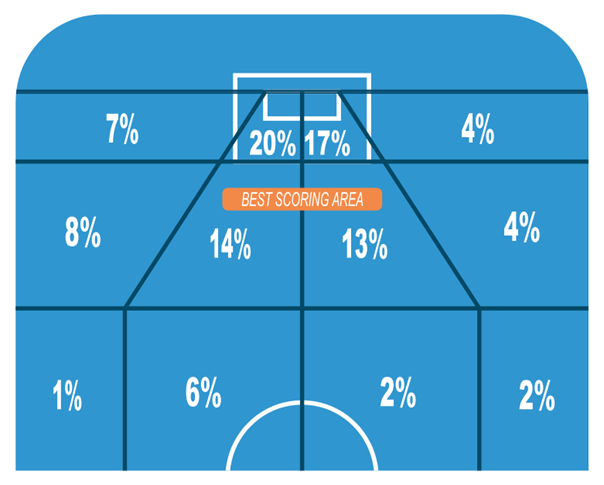
The image above is from the same research mentioned earlier. The researchers have called the ‘best scoring area’ the triangle. From these places 64% of the goals are made! When shooting from this area, it is important to try to ‘make the goal as small as possible’, i.e. to cover as much of the goal as you canl.
Disclaimer: a lot of Paint (the software) has been used in the following part. I have shown different scenarios in the pictures below, both in which the goalkeeper is close to its goal or far away:

The green oval circles are the goalies. The blue circle is the ball. In the example on the left, you can see from the thin lines that the ball can go past the goalkeeper into the goal. In the right example, the goalkeeper has moved forward a bit – and now the ball can no longer go past him into the goal!
Of course, this is only schematic, but it indicates that the further you get out (move forward), the more difficult it becomes for the opponent to score.
Unfortunately, the opponent has thought of this… he’s going to move with the ball, and you as goalie have to slide along.
In the two scenarios below, we have changed the image above to the moment the player with the ball moves a bit to the left. The red indicates the size of the part of the goal that is ‘open’, i.e., the area not covered by the goalkeeper.
Example 1: the goalkeeper is close to his goal
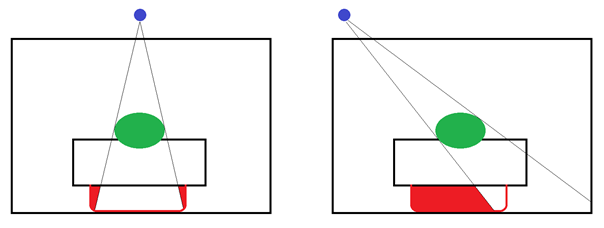
In the left picture, the attacker has a small chance to score, but in the right picture, this chance is much bigger. Still, with a small movement to the left, the goalkeeper can correct his placement quite quickly.
Example 2: the goalkeeper is further away from his goal
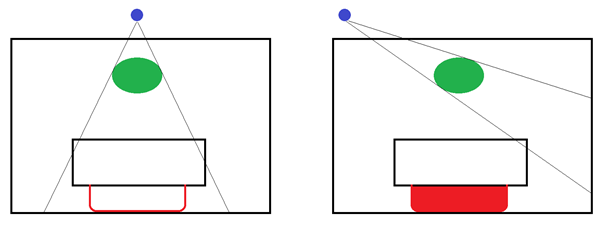
In the image on the left we see a goalkeeper covering his goal completely. However, a small movement by the field player exposes the complete goal.
Goalie’s dilemma
These schematic views reveal the dilemma of each goalie. The further you move forward as a goalkeeper, the more surface area of the goal you cover and thus: the smaller the chance of scoring a goal. However, if the attacker moves the ball across the width of the pitch, you have to move more meters to the left or right in order to stay between the ball and the goal.
The goalkeeper who stays close to the goal covers a smaller area and may therefore concede more goals from direct shots. However, if the opponent plays the ball across the pitch, the goalie only has to move a small distance to get back between the ball and the goal.

The choice depends on a number of aspects, of which the most important two are:
- Your own speed. Can you move back and forth quickly? Then it’s safer to be a little further away from your goal than when you can’t move so fast from left to right.
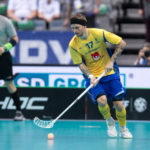
- The opponent’s action. If you know a specific opponent always chooses to shoot instead of playing a cross pass, you can anticipate by moving forward so you cover more of the goal, as Weronika Noga (Poland) does in the picture below:
How to practice (at home)
I want to discuss a few specific ways to improve your skills as a goalkeeper: film yourself, and use strings. I’ll explain them below. Furthermore, a number of basic tips, which I’ll discuss in more detail in the next article.
Film yourself
This may be the best and simplest tip there is. Film yourself, or let someone else film you. This can be during a game, but also during an exercise or ‘just’ when you’re in the goal.
With the help of a tablet or smartphone, you can get live feedback. Several goalie camps are already using this, such as the Warberg Goalie Camp (as early as 2016).
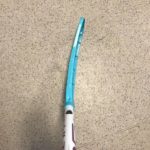
Attach strings to the goal
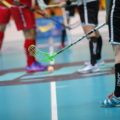
Pontus Boman, ‘Malvaktsfokus’ on Instagram, is a must to follow. He has all kinds of good tips for goalies, like this one: the strings to the goal.
What are they doing here? This makes it very clear to the goalkeeper which area he has to protect. You drag the strings towards one spot (where the ball is), and suddenly, it all becomes clear for the goalkeeper which areas he needs to cover. If a shot stays within the lines, it will be a shot at goal. In this way, as a goalkeeper, you realize much better whether you are sitting in the right place.
Basic tips
Don’t have floorball training or just want to practice more at home? Then you can practice these tips below!
- Practice catching balls by throwing one or two floorball balls against the wall and then catch the ball(s) again. Do this in every possible way: with only left; with only right; throwing with left, catching with right; with two balls at the same time. Practicing catching can also be done by learning to juggle.
- Practice your basic posture as a goalkeeper. This is a core exercise, try for example to sit up straight for half a minute: chest up, shoulders back, one leg under you, other leg stretched to the side, and your hands just visible from the corners of your eye. Is this easy? But then 3 times a minute, or try to ‘sink in’ and then be back in your basic posture within a second.
- How do you slide back and forth as a goalkeeper? You start in the basic posture, pull in your ‘stretched-out’ leg, and push yourself with your leg towards the direction your knees are pointing. If you want to go back again, you change the position of your legs. Try to keep the basic posture right, i.e. sitting upright to be able to stop as many shots as possible
- A final, practical tip: always try to know where you are in the target area. You can orientate yourself by feeling where the goalposts are and by looking at your opponent’s goal (this is on the same line as your goal).
What to expect in our follow-up
This depends on… you!
Well, not completely, but I’d like to give you the opportunity to send in questions. In the coming weeks I want to work on part 2 of the goalie articles. I’ve already asked you on Instagram what you would like to read about. Results were (among others): the mental part of goalkeeping, tactics, how do you dive, what type of shot is hardest to save, offcourt practice, and so on.
I am going to ask a few world-class goalkeepers if they would like to answer some of your questions. Do you have any other, specific questions? Let me know at daniel [@] floorballtoday.com. I’ll then pass your question on to the pro keepers and maybe you’ll read the answer in part 2!
[/ppp_patron_only]


No Comments
Leave a comment Cancel